

When it comes to framing a perfect picture of a potential buyer’s home, the property photo is where everything starts. In real estate, more than the property itself, it’s the visual marketing that makes the difference. Therefore, if you do not use an effective strategy to showcase the property, your listing may never even get an inquiry.
In truth, however, photo editing for exterior areas is challenging. Natural lighting conditions are unpredictable and constantly changing. Shadows, glare, washed-out areas, and odd color casts can ruin an otherwise great shot of a home’s curb appeal.
The good news is that with the right tips and techniques, you can overcome tricky lighting situations. In this article, we’ll provide eight practical methods to address various exterior lighting challenges. In the case where you do not wish to take this load upon your team or yourself, we’ll also discuss how real estate photo editing outsourcing can come in handy.
Managing exterior lighting in real estate photos: A quick-fix guide
Start with the photography strategy
Let the truth be told – your real estate photo editing can only go as far as the photo you’ve taken. If you are working with a camera phone photo, don’t waste time on it. It will never stand to compete with the HDR stuff. The better option is to hire a professional who can deliver high-quality photos. This is also where you can fix most of the lighting issues, particularly by choosing the right time of the day to shoot the property.
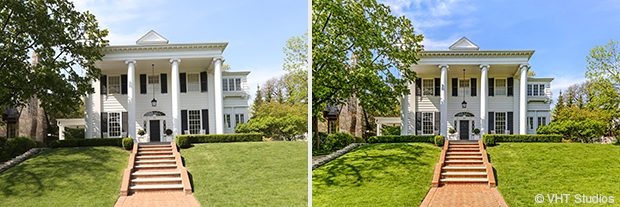
Sample photos reference

https://cdn.nar.realtor/sites/default/files/assets/images/mar18_photo_tri.jpg
Tip: Pro shots demand pro gear. So, get a tripod and an HDR camera, or simply hire a photographer experienced in real estate jobs.
Capture photos in correct angles
When it comes to real estate, the angle can make or break a property’s entire sale. The biggest tip here is to use a tripod to level with the horizon and vertically align. This will eliminate the biggest issues with angling like crooked lines, perspective distortion, etc.
Sample photos reference
http://timelinedc.com/blog/2014/04/tilt-shift-lenses-tech-thursday/
Tip: Tilting and shifting are terms for horizontal and vertical alignment on cameras. You can combine them to understand the ideal depth of field for your property shot. Also, check out the tilt shift lens for more vertical visual sync to minimize your photo distortions.
Choose a photo editing tool
The best photo editing tool out there is Adobe Photoshop. It has all the tools you may need to edit your real estate photos to perfection. However, the industry consensus on this is Aurora HDR. This tool enables all the photo work one may need, like noise removal, clarity, definition, chromatic aberration etc. Aurora enables HDR merging for the best post-processing the market has to offer. Depending on your budget (because free tools are likely not to offer the extent of editing capabilities that property photos usually need), you should also check other options available in the market.
The reason to stress on choosing a real estate photo editing tool is simple – it will determine how the final photos turn out. So, pick one that can closely cater to your requirements.
Understand the key players
The most common photo editing tasks for real estate pictures are:
Corrections:
- Color correction
- Fixing light exposure and color casts
- Removing noise
Enhancements:
- Enhancing skies and lawns
- Improving pools
- Fixing shadows
- HDR blending
There are two main approaches – correcting issues vs replacing/removing elements. The best approach depends on the specific photo and the property’s biggest problem areas.
The key is to be flexible since every photo is unique. But once you know how to do these key photo editing tasks, it becomes much easier to significantly improve real estate photos.
Mind the lines
One of the most common problems in real estate photography is perspective distortion. If vertical lines appear to converge instead of being parallel, or if there are leaning effects, it creates visual tension and reduces appeal. Subtly adjusting the perspective not only fixes distracting distortions, but also makes interiors and exteriors look crisper, squarer, and more spacious.
You can find a transform tool in most editing software to digitally correct skewed vertical and horizontal lines. Align roof lines, walls, doors, windows, and other lines that should be perpendicular. With this quick adjustment, listings stand out and leave lasting positive impressions on buyers.
Balance color and saturation
Once the lines and exposure are straightened up, bring the color and saturation into focus. Real estate markets require photorealistic appearances on their property pics. That impact can be created by looking at saturation, tint, tone and hue. Each of these defines a certain aspect of the picture and you want to get them all to blend well to present a clear and well-defined image.
Colors need to stand out distinctly without becoming oppressive. For example, when including the sky and lawn in a shot, use color selectively to draw the eye to the home itself. Enhance the colors of the house so it naturally becomes the focal point, while muting competing elements. The idea is to highlight what is best and hide the rest or otherwise make it appear irrelevant.
Cut the noise
Noise is anything that makes the picture unclear. It can be light diffusion or the type of lens used or something else. Consider working through multiple filters to find the right mix.
Whatever it is needs identifying and the correcting will depend on its origin and overall effect. This includes color haze correcting or general dehazing plus optimizing the photo’s sharpness. You could do this via photo exposure blending until you find the right mix.
In case you do not have multiple exposures, consider using an auto-blend option. Photoshop has one, you can use it but remember to tweak the frequency of the pictures to get the correct combination.
Minimize unnecessary shadows
Harsh shadows can diminish otherwise strong real estate photos, so diffusing and balancing light is key. The goal is to bathe the property in ample illumination without any washed-out haziness. This requires carefully adjusting highlights and shadows to create pleasing contrast. However, before post-processing, capture images using optimal lighting conditions.
While some shadows, like those from a stately tree, can accentuate handsome architectural details, others should be mitigated. Shaded porches or verandas, for example, must not appear too dim or murky – even in twilight photos. Subtle lighting allows these selling features to stand out rather than recede into darkness.
The trick is to moderately saturate beneficial shadows that showcase the home’s finest aspects. At the same time, reduce any shadows that conceal, distract or detract. With a few adjustments, you can transform lackluster photos by controlling bothersome shadows while retaining those that artfully showcase the residence. The end result is a portfolio brimming with clarity, character and curb appeal.
Round-up: How to get a perfect look in your real estate photos
It is recommended to work on all of these fronts and move into HDR territory gradually. Consider using multiple filters for portfolio batches and preformat them based on client-approved benchmarks. This will save you a lot of time.
Alternatively, you can also reach out to real estate photo editing services providers. These third-party companies usually carry a team of specialist photo editors and can provide almost immediate outcomes (within hours, in many cases). This is also a cost-effective option for realtors or photographers who do not want to establish an editing team in-house.
On an ending note, we would like to recommend checking out our blog on real estate photo editing. We have some great tips for you on how photo editing services can help your real estate business right here!


